Over the course of building my blog, I have experimented different levels of custom Markdown rendering solutions. In this post, I will provide a concise introduction to each of these methods.
Let us consider the following example. Suppose you have the following Markdown document:
A hello world in Python:
```python
print("Hello world!")
```And you want to add a language indicator to the corner, just like this:
print("Hello world!")How might one achieve this result? (Sorry, no MDX here, we are talking about standard Markdown.)
Manipulate HTML via regular expressions #
The simplest solution would be doing regular expression replacements based on HTML rendered by third-party tools. Since my blog is build on GitHub issues, we will just start with the HTML return by GitHub:
<p dir="auto">A hello world in Python:</p>
<div class="highlight highlight-source-python notranslate position-relative overflow-auto" dir="auto" data-snippet-clipboard-copy-content="print("Hello world!")">
<pre class="notranslate"><span class="pl-en">print</span>(<span class="pl-s">"Hello world!"</span>)</pre>
</div>We need to extract python from the class and add a div with class code-lang. The code is
html.replace(/(<div class="highlight highlight-source-([a-z]+) [^>]+>)/g, '$1<div class="code-lang">$2</div>')with the result being
<p dir="auto">A hello world in Python:</p>
<div class="highlight highlight-source-python notranslate position-relative overflow-auto" dir="auto" data-snippet-clipboard-copy-content="print("Hello world!")">
<div class="code-lang">python</div>
<pre class="notranslate"><span class="pl-en">print</span>(<span class="pl-s">"Hello world!"</span>)</pre>
</div>The problem is, the regular expression replacements are not always straightforward, and may have some unexpected results. Moreover, if GitHub changes the way HTML is rendered, my regular expression may suddenly stop working.
To enable more customizations and avoid such breaking changes made by GitHub, I moved on to the next level of Markdown custom rendering.
Remark and rehype #
Remark is a tool that transforms Markdown with plugins, and rehype is for HTML. Markdown will first be parsed to AST by remark, and rehype will transform it to HTML AST and render it as HTML.
A basic example rendering and highlighting a code block is shown below:
import rehypeHighlight from 'rehype-highlight'
import remarkParse from 'remark-parse'
import remarkRehype from 'remark-rehype'
import { unified } from 'unified'
import rehypeStringify from 'rehype-stringify'

const markdown='A hello world in Python:\n```python\nprint("Hello world!")\n```'

const markdownRenderer = unified()
  .use(remarkParse)
  .use(remarkRehype)
  .use(rehypeHighlight)
  .use(rehypeStringify)

console.log((await markdownRenderer.process(markdown)).value)And the output HTML is
<p>A hello world in Python:</p>
<pre><code class="hljs language-python"><span class="hljs-built_in">print</span>(<span class="hljs-string">"Hello world!"</span>)
</code></pre>To achieve custom Markdown rendering, one can create simple plugins manipulating Markdown AST or HTML AST. In the following code, we visit all nodes in HTML AST (hast), and find all <code> tags that is a child of a <pre> tag. We then match the class name and add a .code-lang child.
// ...
import { h } from 'hastscript'
import { visit } from 'unist-util-visit'

const enhanceCodeBlock = () => (htmlNodes) => {
  visit(htmlNodes, 'element', (node) => {
    if (
      node.tagName === 'pre' &&
      node.children[0].type === 'element' &&
      node.children[0].tagName === 'code'
    ) {
      const codeElement = node.children[0]
      if (codeElement.properties.className) {
        console.log(codeElement)
        const classNames = codeElement.properties.className
        const language = classNames
          .find((className) => className.startsWith('language-'))
          .slice('language-'.length)
        node.children.push(h('div.code-lang', language))
      } else {
        codeElement.properties.className = ['hljs']
      }
    }
  })
}

const markdownRenderer = unified()
  .use(remarkParse)
  .use(remarkRehype)
  .use(rehypeHighlight)
  .use(enhanceCodeBlock)
  .use(rehypeStringify)

// ...And the resulting HTML is:
<p>A hello world in Python:</p>
<pre><code class="hljs language-python"><span class="hljs-built_in">print</span>(<span class="hljs-string">"Hello world!"</span>)
</code><div class="code-lang">python</div></pre>Manipulating the AST is much safer and more straightforward than plain regular expression replacements, and thus enabling further customizations.
One problem, though, is that it is limited to adding simple DOM elements. If the element grows more and more complicated and nested, or components from some frontend frameworks are needed, this approach will not work well.
I have always wanted to use an Astro component for my blog images, but I have no idea how to achieve this, until I discovered the final (?) level of Markdown custom rendering.
Direct rendering Markdown AST #
We can remove rehype all together and just use remark to parse and transform Markdown AST. Then, Astro (or any of your favorite frontend framework) can do the job of rendering Markdown AST to HTML. The drawback is that the component should handle all node types, even if customization is only needed for a single node type.
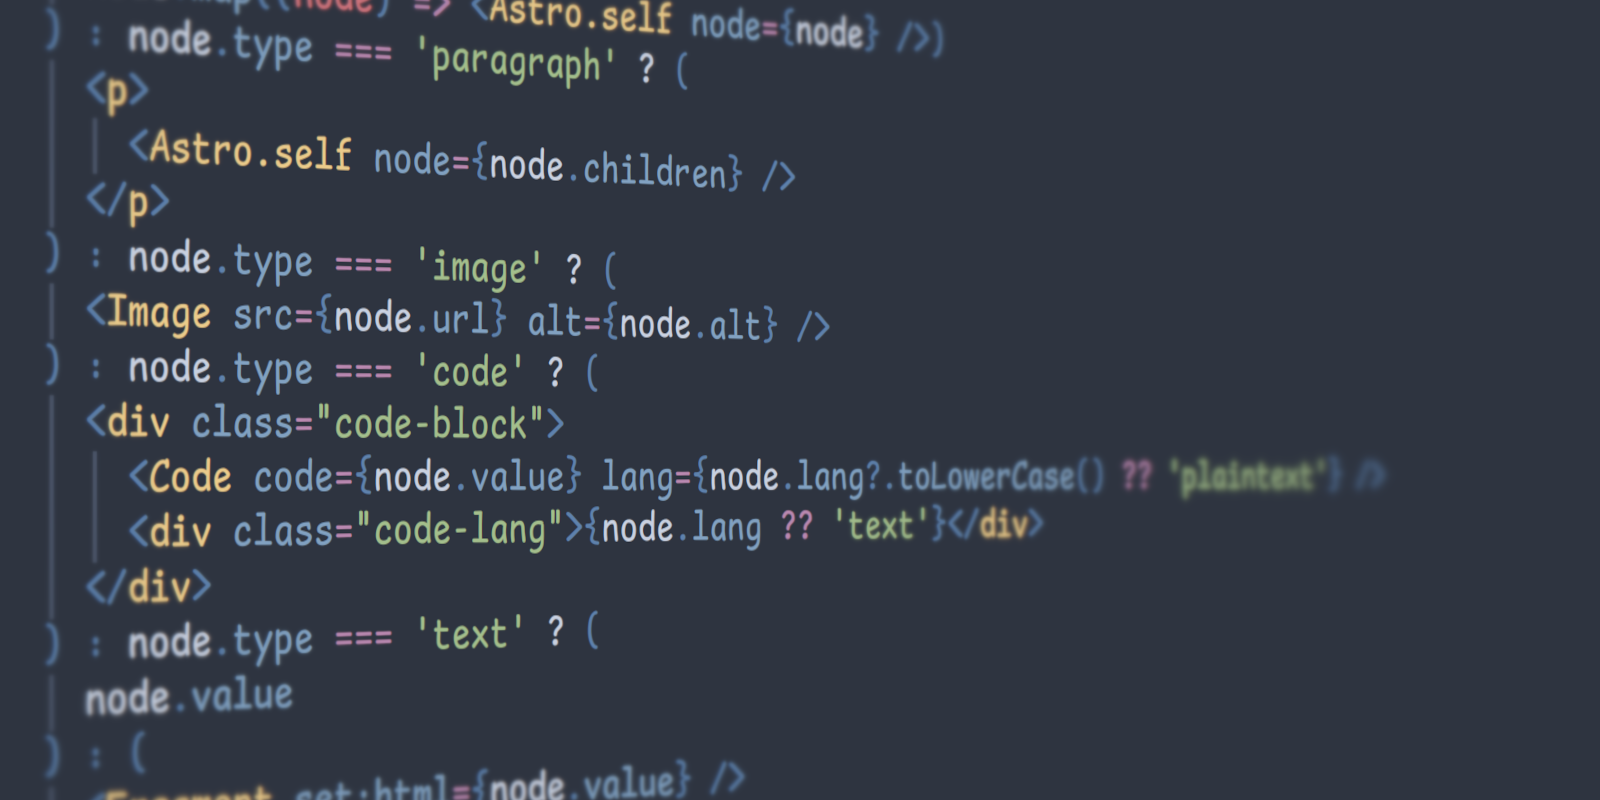
In the following code example, I have removed irrelevant parts to be concise:
---
import Code from '@components/markdown/Code.astro'
import type { RootContent } from 'mdast'

export interface Props {
  node: RootContent | RootContent[]
}

const { node } = Astro.props
---

{
  Array.isArray(node) ? (
    node.map((node) => <Astro.self node={node} />)
  ) : node.type === 'paragraph' ? (
    <p>
      <Astro.self node={node.children} />
    </p>
  ) : node.type === 'image' ? (
    <Image src={node.url} alt={node.alt} />
  ) : node.type === 'code' ? (
    <div class="code-block">
      <Code code={node.value} lang={node.lang?.toLowerCase() ?? 'plaintext'} />
      <div class="code-lang">{node.lang ?? 'text'}</div>
    </div>
  ) : node.type === 'text' ? (
    node.value
  ) : (
    <Fragment set:html={node.value} />
  )
}The total LOC is definitely increased a lot compared with the previous example using rehype plugins. However, the relevant part for inserting .code-lang is even more simple and intuitive. More importantly, I can have as much logic as I needed in the <Image> component, such as downloading the image and extracting the dimensions, creating low quality image placeholders (LQIP), etc. Since it essentially turns the plain Markdown to components, you can leverage the full power of Astro. For more examples, you can check out the code of this blog.
Conclusion #
Three different approaches for Markdown customization are introduced. However, exactly which method to choose depends on the specific situation and needs. If all you need is a simple modification, the regular expression approach may suit you best. If more customizations are needed, you can consider the second and even the third approach.
My solution is writing a simple
rehypeplugin to compile the HTML tree to an Astro JSX, as Astro guarantees its JSX syntax to be a superset of HTML. I use this plugin to inline<style>and<script>tags, escape<style>CSS, and import all Astro components mentioned in the HTML tree. The output will be provided as Vite virtual files, so the Astro compiler can further handle them. The down side of this setting is, the whole Astro markdown pipeline is evaded (including content collections, which shouldn't be useful in your Issues pipeline)