Microsoft has recently waived the registration fee for individual developer accounts on the Microsoft Store. This means you can now upload your app bundles and have Microsoft sign them for free — bypassing the notorious SmartScreen warnings users typically encounter when launching unsigned apps. Normally, obtaining a code-signing certificate costs hundreds of dollars per year. Now, you can get all that — for free — simply by publishing your app through the Microsoft Store.
Registering a Store Account #
The first step is to create a Microsoft Store developer account. Head to https://developer.microsoft.com/en-us/microsoft-store and click "Get started." Choose the Individual developer option and proceed.

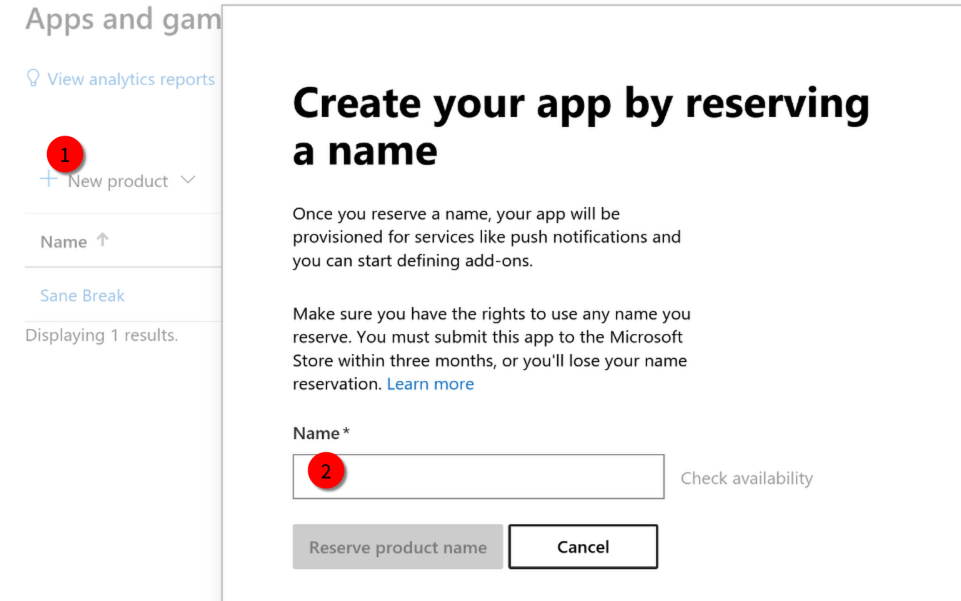
Microsoft will ask for personal information to verify your identity — I won't go into those details here. Once verified, navigate to the Partner Center Dashboard and click "Apps and Games." On the next page, click "New product" and select "MSIX or PWA app."
Avoid selecting "EXE or MSI app." Microsoft only signs apps distributed as MSIX bundles — not EXE or MSI installers.
In the prompt, enter your app's name and reserve it.
Next, fill in your app's details. If you plan to charge for your app, you'll need to complete tax forms under "Settings" → "Account settings" → "Payout and tax profiles."
That's the high-level overview — fairly similar to other app stores. Now, let's dive into the technical side: packaging.
Building MSIX Packages #
While CMake and CPack support many packaging formats, MSIX (formerly APPX) isn't natively supported. It requires some extra setup and a bit of reading through Microsoft's documentation — but it's not as daunting as it might seem.
We'll largely follow Microsoft's guide: Generating MSIX package components. I won't repeat everything here — instead, I'll highlight areas where the documentation may be unclear or incomplete. Be sure to read the official docs alongside this guide.
First, you'll need an AppxManifest.xml — the metadata file for your app. Since you're using Qt and CMake, you can create a template that autofills version info. Here's an example:
<?xml version="1.0" encoding="utf-8"?>
<Package
  xmlns="http://schemas.microsoft.com/appx/manifest/foundation/windows10"
  xmlns:uap="http://schemas.microsoft.com/appx/manifest/uap/windows10"
  xmlns:uap10="http://schemas.microsoft.com/appx/manifest/uap/windows10/10"
  xmlns:rescap="http://schemas.microsoft.com/appx/manifest/foundation/windows10/restrictedcapabilities">
  <Identity
    Name=""
    Version="@CMAKE_PROJECT_VERSION@.0"
    Publisher="CN="
    ProcessorArchitecture="x64" />
  <Properties>
    <DisplayName></DisplayName>
    <PublisherDisplayName></PublisherDisplayName>
    <Description></Description>
    <Logo>logo/Logo.png</Logo>
  </Properties>
  <Resources>
    <Resource Language="en-us" />
  </Resources>
  <Dependencies>
    <TargetDeviceFamily Name="Windows.Desktop" MinVersion="10.0.17763.0" MaxVersionTested="10.0.22621.0" />
  </Dependencies>
  <Capabilities>
    <rescap:Capability Name="runFullTrust"/>
  </Capabilities>
  <Applications>
    <Application Id="" Executable=""
      EntryPoint="Windows.FullTrustApplication">
      <uap:VisualElements
        DisplayName=""
        Description=""
        Square150x150Logo="logo/Tile.png"
        Square44x44Logo="logo/AppList.png"
        BackgroundColor="transparent" />
    </Application>
  </Applications>
</Package>You'll find the values for Identity.Name, DisplayName (which differs from Identity.Name), Publisher (CN=), and PublisherDisplayName in the "View product identity" section of your app's page in Partner Center.
Notice that although Microsoft Store uses 4-digit versioning (1.2.3.0), the last digit should always be zero, or Microsoft will reject your bundle.
For <rescap:Capability>, since you're packaging a classic desktop app, runFullTrust is the only valid option.
One thing to keep in mind: once your app is packaged as an MSIX, it runs under Desktop Bridge — and that changes a few things. For example, you can’t just write to HKCU or other parts of the registry like before. Want your app to auto-start? You’ll need to use the StartupTask class from WinRT. There are other quirks too — check out Microsoft’s guide on how packaged desktop apps behave to avoid surprises.
Now, another tricky part: <uap:VisualElements>. Although the manifest only references logo/Tile.png and logo/AppList.png, that's not enough. As noted in the documentation, if you omit the logo/AppList_altform-unplated.png variant, Windows will display your app icon in the taskbar with a square background using the color specified in BackgroundColor. Even if you specified BackgroundColor="transparent" , Windows defaults to an blue square background — reminiscent of Windows 10's early UI.
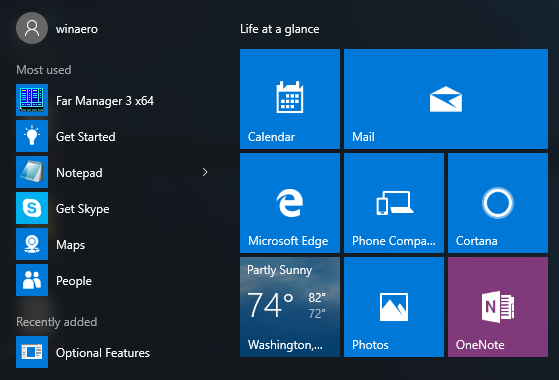
Image credit Winaero
But wait — there's more. To ensure your app looks sharp and professional across every Windows interface, you'll need to provide a full set of logo variants. According to Microsoft's Construct your Windows app's icon guide, that means generating assets in sizes 16×16 up to 256×256 — specifically: 16, 20, 24, 30, 32, 36, 40, 48, 60, 64, 72, 80, 96, and 256 pixels — across three visual styles: default, dark (_altform-unplated), and light (_altform-lightunplated).
AppList.targetsize-16.pngAppList.targetsize-20.png- ...
AppList.targetsize-96.pngAppList.targetsize-256.pngAppList.targetsize-16_altform-unplated.png- ...
AppList.targetsize-16_altform-lightunplated.png- ...
Tile.scale-100.pngTile.scale-125.png- ...
Tile.scale-400.png
You can learn more about resource naming in Tailor your resources for language, scale, high contrast, and other qualifiers.
Once everything is prepared, it's time to build. Below is a CMake snippet that uses configure_file to inject version info into AppxManifest.xml.in, and defines a custom target to handle the packaging:
find_program(MAKEAPPX_EXECUTABLE makeappx)
find_program(MAKEPRI_EXECUTABLE makepri)

if(NOT MAKEAPPX_EXECUTABLE OR NOT MAKEPRI_EXECUTABLE)
  message(WARNING "makeappx not found! Install Windows App SDK or packaging tools.")
else()
  set(MSIX_NAME "app.msix")
  set(MSIX_OUTPUT_PATH "${CMAKE_BINARY_DIR}/${MSIX_NAME}")

  configure_file(
    ${CMAKE_CURRENT_SOURCE_DIR}/AppxManifest.xml.in
    ${CMAKE_BINARY_DIR}/AppxManifest.xml
  )

  add_custom_target(
    msix
    BYPRODUCTS ${MSIX_OUTPUT_PATH}
    COMMAND ${CMAKE_COMMAND} -E remove_directory msix
    COMMAND ${CMAKE_COMMAND} -E make_directory msix
    COMMAND ${CMAKE_COMMAND} -E copy $<TARGET_FILE:app> msix/app.exe
    COMMAND ${CMAKE_COMMAND} -E copy ${CMAKE_BINARY_DIR}/AppxManifest.xml msix/AppxManifest.xml
    COMMAND ${CMAKE_COMMAND} -E copy_directory ${CMAKE_CURRENT_SOURCE_DIR}/logo msix/logo
    COMMAND ${MAKEPRI_EXECUTABLE} createconfig /cf msix/priconfig.xml /dq en-US
    COMMAND ${MAKEPRI_EXECUTABLE} new /pr msix /cf msix/priconfig.xml /of msix/resources.pri
    COMMAND ${MAKEAPPX_EXECUTABLE} pack /d msix /p ${MSIX_OUTPUT_PATH} /o
    WORKING_DIRECTORY ${CMAKE_BINARY_DIR}
    COMMENT "Creating MSIX package: ${MSIX_OUTPUT_PATH}"
    VERBATIM
  )

  add_dependencies(msix app)
endif()The CMake script above automates the creation of your MSIX package by stitching together your compiled executable, manifest, and assets — then invoking Microsoft's packaging tools (makepri and makeappx) to generate the final .msix file. Make sure you have these tools installed. Usually they are already installed if you have installed Visual Studio, and open the Visual Studio command line prompt correctly.
MSIX requires a binary resource index (resources.pri) for localization and scaling. We generate a basic config (priconfig.xml) and then build the index. Even if you're only supporting en-US, this step is mandatory. Finally, makeappx pack bundles everything into app.msix. The /o flag overwrites existing output, and /d msix tells it to package the contents of the msix/ directory.
You can trigger the build with:
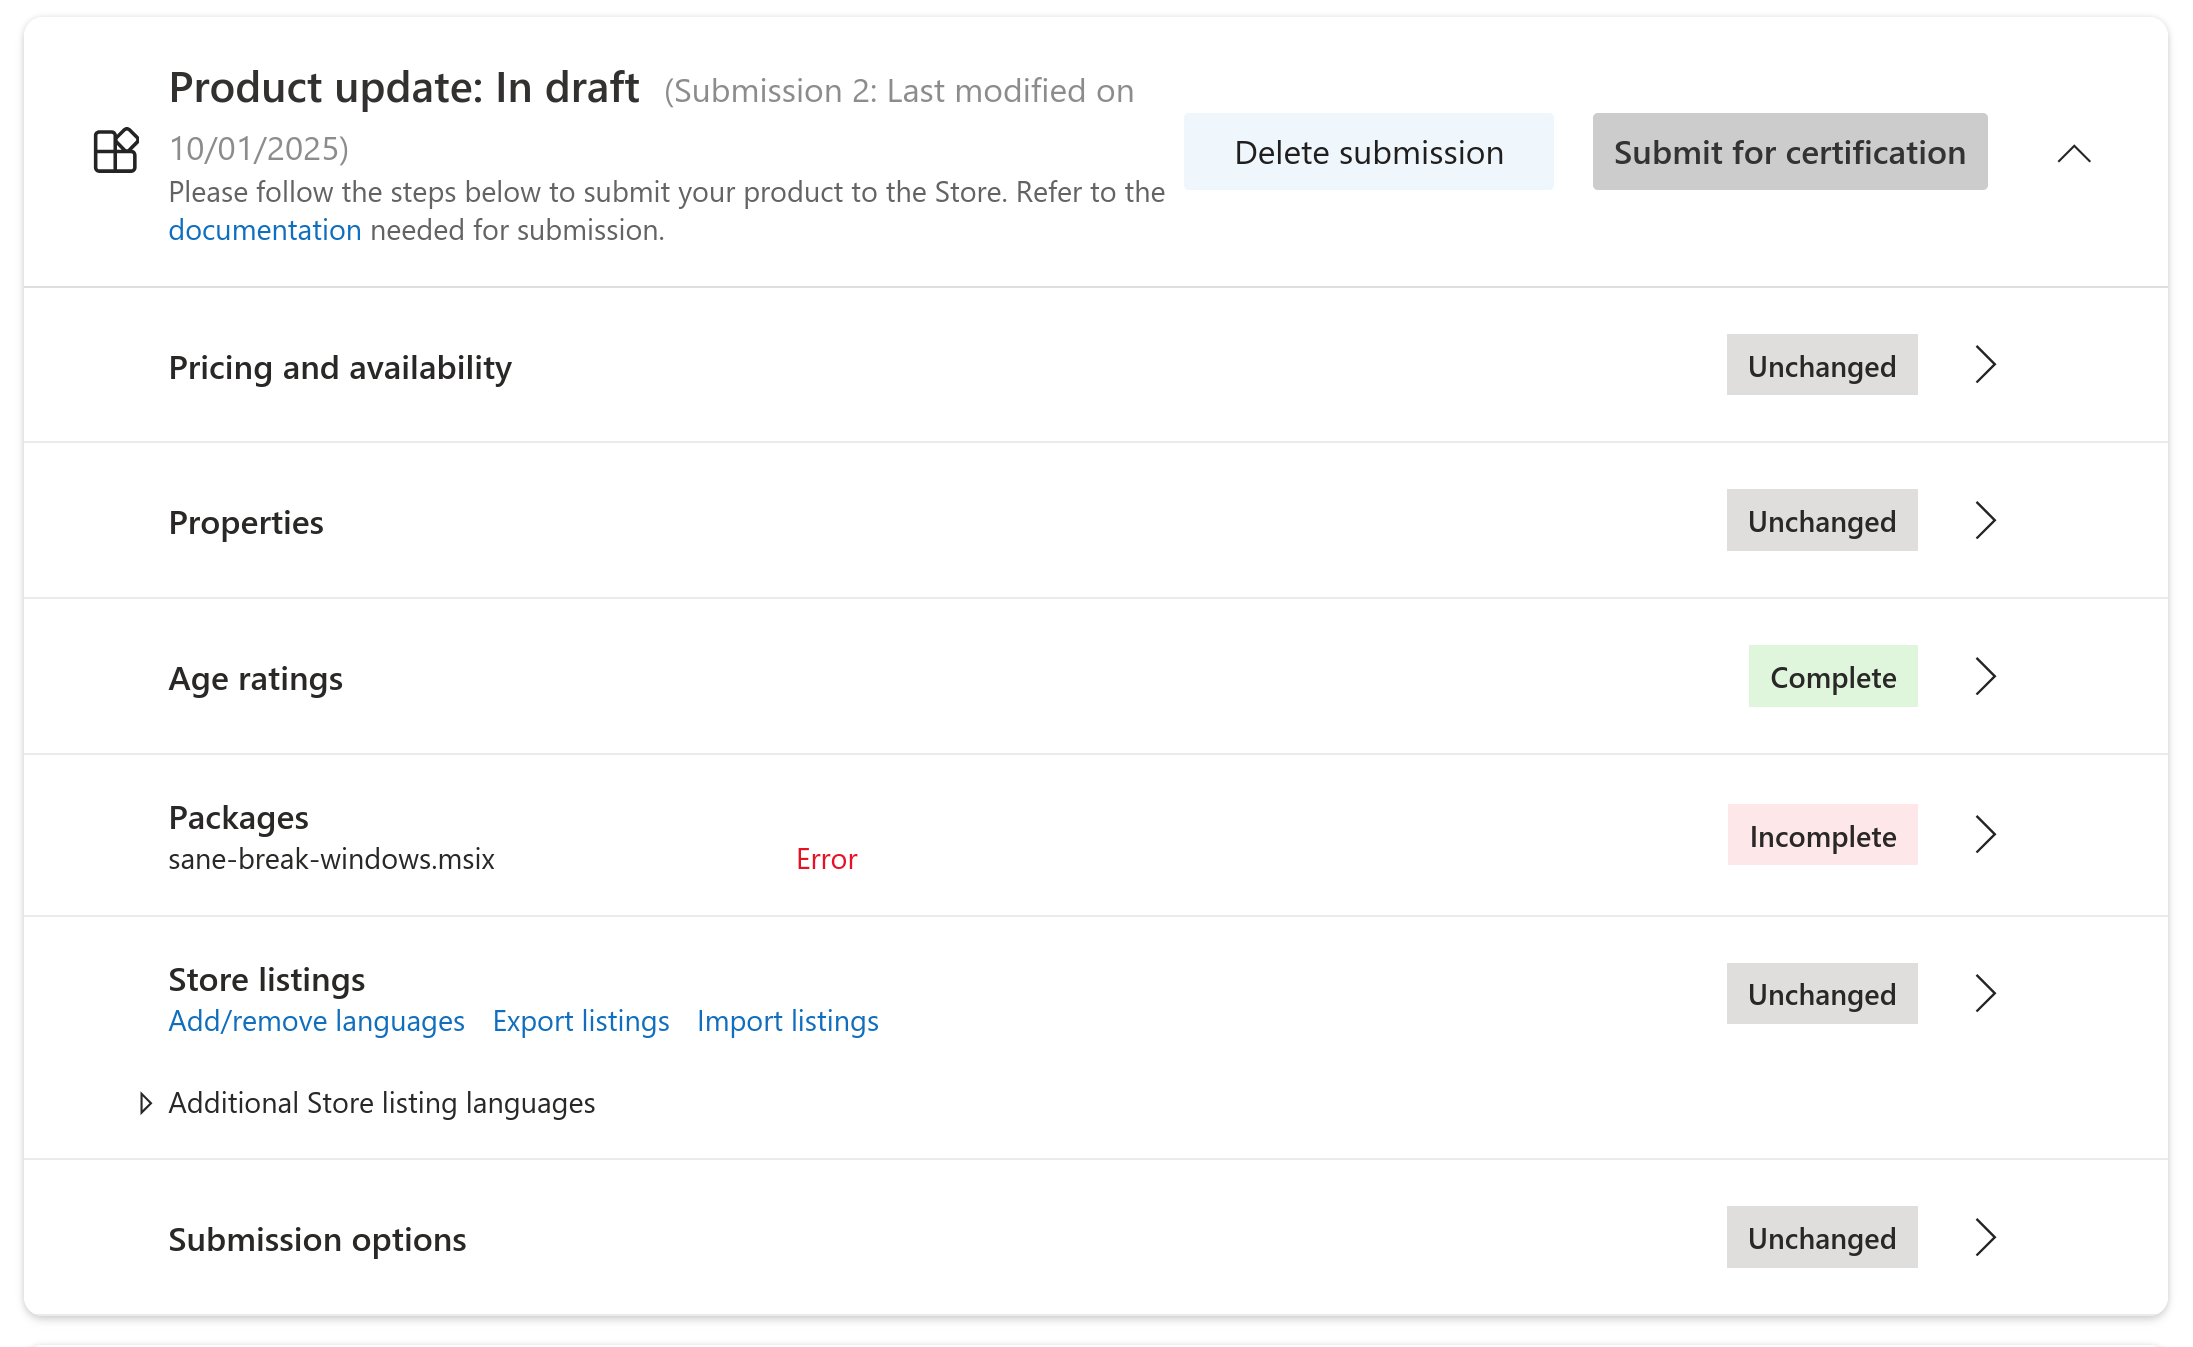
cmake --build . --target msixAfter that, you can upload the MSIX bundle to the Microsoft Store, and finish the submission process.